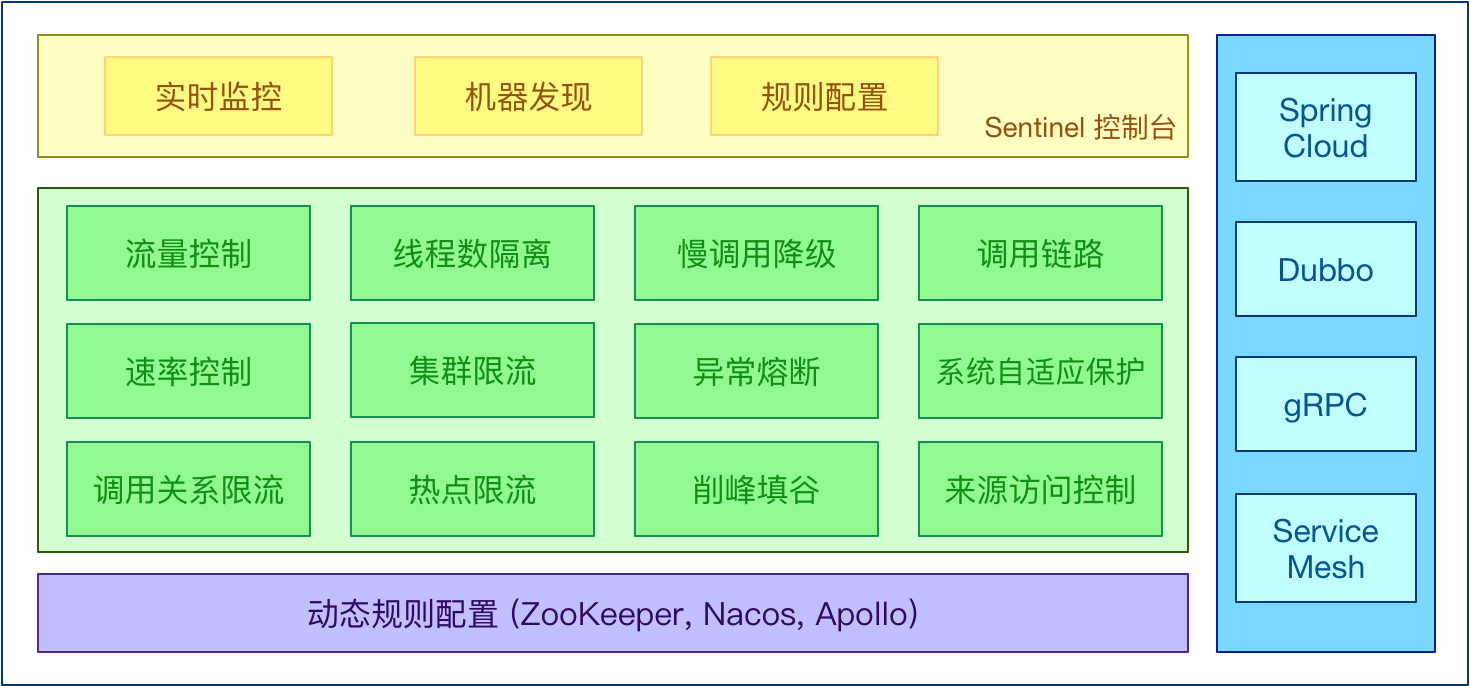
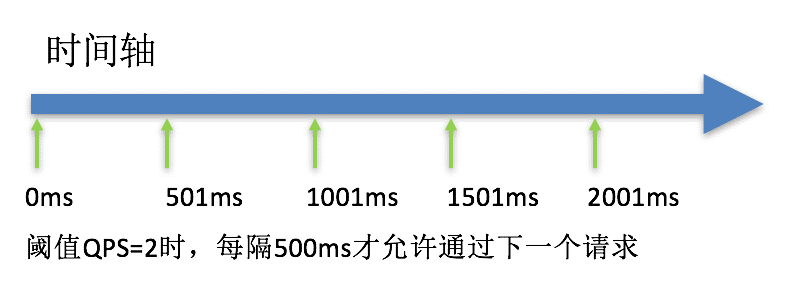
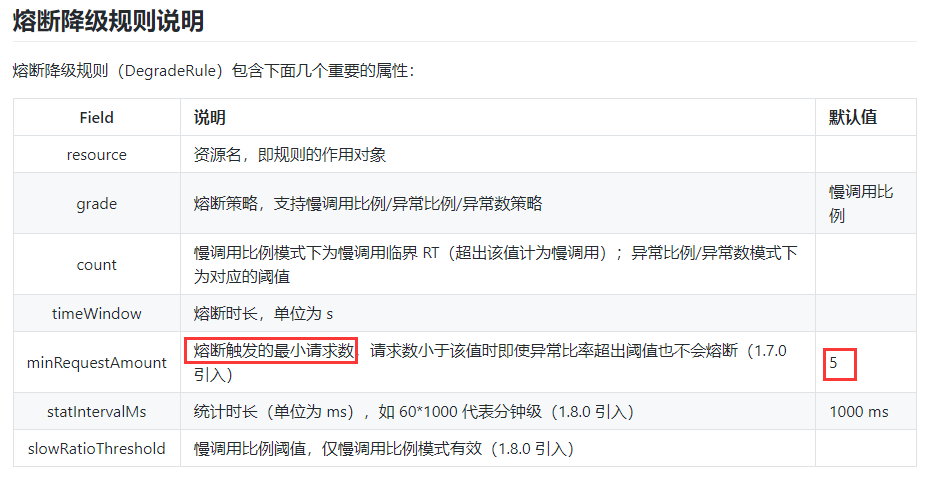
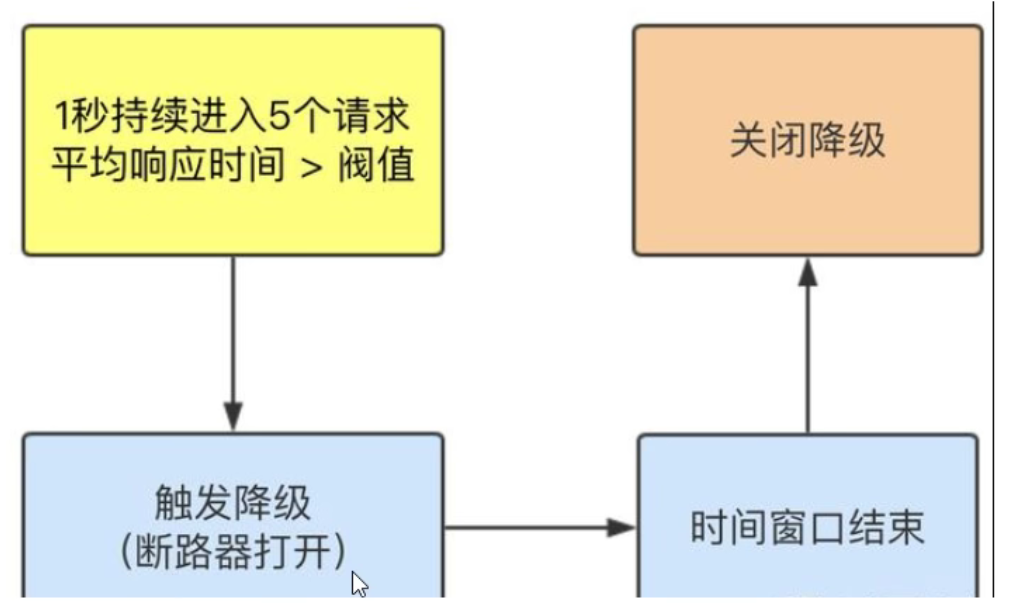
除了流量控制以外,对调用链路中不稳定的资源进行熔断降级也是保障高可用的重要措施之一。一个服务常常会调用别的模块,可能是另外的一个远程服务、数据库,或者第三方 API 等。例如,支付的时候,可能需要远程调用银联提供的 API;查询某个商品的价格,可能需要进行数据库查询。然而,这个被依赖服务的稳定性是不能保证的。如果依赖的服务出现了不稳定的情况,请求的响应时间变长,那么调用服务的方法的响应时间也会变长,线程会产生堆积,最终可能耗尽业务自身的线程池,服务本身也变得不可用。
@GetMapping("/byResource") @SentinelResource(value = "byResource", blockHandler = "handleException")//按照资源限流,可自定义处理程序 public CommonResult byResource(){ returnnew CommonResult(200, "按照资源限流", new User("wang", 10)); }
public CommonResult handleException(BlockException exception){ //如果没有自定义处理程序,会报500(找不到FlowException) returnnew CommonResult(444, exception.getClass().getCanonicalName()); }
@GetMapping("/byResourceUrl")//按照Url地址限流,会走系统默认处理程序 public CommonResult byResourceUrl(){ returnnew CommonResult(200, "按照Url地址限流", new User("wang", 10)); }
@GetMapping("/CustomerHandle")// @SentinelResource(value = "CustomerHandle", blockHandlerClass = CustomerBlockHandle.class, blockHandler = "handleException1") public CommonResult CustomerHandle(){ returnnew CommonResult(200, "按照资源地址限流", new User("wang", 10)); }
}
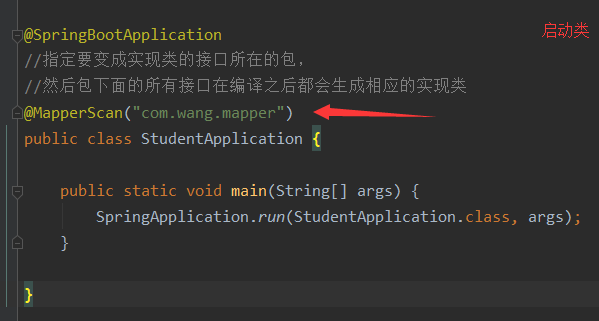
启动类
1
2
3
4
5
6
7
@SpringBootApplication @EnableDiscoveryClient public class MainApp8401 { public static void main(String[] args) { SpringApplication.run(MainApp8401.class,args); } }
@GetMapping("/paymentSQL/{id}") public CommonResult<User> paymentSQL(@PathVariable("id") Integer id){ User user = hashMap.get(id); CommonResult<User> result = new CommonResult(200 ,"端口"+ serverPort ,user); return result; } }
public CommonResult<User> handleFallback(Integer id,Throwable e){ User user = new User("null", null); returnnew CommonResult<>(444,"handleFallback兜底异常"+e.getMessage(),user); }
public CommonResult<User> blockHandler(Integer id, BlockException e){ User user = new User("null", null); returnnew CommonResult<>(445,"blockHandler兜底异常"+e.getLocalizedMessage(),user); }
@GetMapping("/ConsumerSQL1/{id}") public CommonResult<User> fallback1(@PathVariable("id") Integer id){ return providerFeign.paymentSQL(id); }
service { #transaction service group mapping vgroup_mapping.seata-server = "default" #only support when registry.type=file, please don't set multiple addresses default.grouplist = "127.0.0.1:8091" #disable seata disableGlobalTransaction = false }
## transaction log store, only used in seata-server store { ## store mode: file、db mode = "db"
## file store property file { ## store location dir dir = "sessionStore" }
## database store property db { ## the implement of javax.sql.DataSource, such as DruidDataSource(druid)/BasicDataSource(dbcp) etc. datasource = "dbcp" ## mysql/oracle/h2/oceanbase etc. db-type = "mysql" driver-class-name = "com.mysql.jdbc.Driver" url = "jdbc:mysql://127.0.0.1:3306/seata" user = "root" password = "123456" } }
<mappernamespace="com.wang.mapper.T_accountMapper"> <updateid="decrease"> update t_account set used = used + #{money},residue = residue - #{money} where user_id=#{user_id} </update> </mapper>
<mappernamespace="com.wang.mapper.T_storageMapper"> <updateid="decrease"> update t_storage set used=used+#{count},residue=residue-#{count} where product_id=#{product_id} </update> </mapper>
127.0.0.1:6379> pfadd pf1 a b c d e f g //向Hyperloglog中添加元素 pfadd 键 值1..... (integer) 1 127.0.0.1:6379> pfcount pf1 //统计元素个数(去重) pfcount 键 (integer) 7 127.0.0.1:6379> pfadd pf2 a a c c b b d d (integer) 1 127.0.0.1:6379> pfcount pf2 (integer) 4 127.0.0.1:6379> pfmerge pf3 pf1 pf2 //合并 pfmerge 新键 要合并的键 OK 127.0.0.1:6379> pfcount pf3 (integer) 7
127.0.0.1:6379> multi //开启事务 OK 127.0.0.1:6379> set k1 v1 //命令入队 QUEUED 127.0.0.1:6379> set k2 v2 //命令入队 QUEUED 127.0.0.1:6379> get k2 //命令入队 QUEUED 127.0.0.1:6379> exec //执行事务 1) OK 2) OK 3) "v2"
事务执行完后就没了,如果还要用事务,就需要重新开启。
取消事务
1 2 3 4 5 6 7 8 9 10 11 12 13 14
127.0.0.1:6379> multi //开启事务 OK 127.0.0.1:6379> set k1 v1 QUEUED 127.0.0.1:6379> set k2 v2 QUEUED 127.0.0.1:6379> set k3 v3 QUEUED 127.0.0.1:6379> discard //取消事务 OK 127.0.0.1:6379> exec (error) ERR EXEC without MULTI //报错(没有要执行的事务) 127.0.0.1:6379> get k3 (nil)
编译时异常(代码有问题!命令有错),在事务中所有的命令都不会被执行!
1 2 3 4 5 6 7 8 9 10 11 12 13 14 15 16 17 18 19
127.0.0.1:6379> multi OK 127.0.0.1:6379> set k1 v1 QUEUED 127.0.0.1:6379> set k2 v2 QUEUED 127.0.0.1:6379> set k3 v3 QUEUED 127.0.0.1:6379> getset k3 //错误的命令 (error) ERR wrong number of arguments for'getset' command 127.0.0.1:6379> set k4 v4 QUEUED 127.0.0.1:6379> set k5 v5 QUEUED 127.0.0.1:6379> exec //执行事务报错 (error) EXECABORT Transaction discarded because of previous errors. 127.0.0.1:6379> get k1 //所有的命令都不会被执行 (nil)
127.0.0.1:6379> multi OK 127.0.0.1:6379> set k1 v1 QUEUED 127.0.0.1:6379> incr k1 //字符型不能自增(编译时不报错,执行时报错,不影响后面代码的执行) QUEUED 127.0.0.1:6379> set k2 v2 QUEUED 127.0.0.1:6379> set k3 v3 QUEUED 127.0.0.1:6379> get k1 QUEUED 127.0.0.1:6379> get k2 QUEUED 127.0.0.1:6379> exec 1) OK 2) (error) ERR value is not an integer or out of range //报错,但不影响后面代码的执行 3) OK 4) OK 5) "v1" 6) "v2"
监控 (Watch) 可以实现乐观锁
悲观锁:
很悲观,认为什么时候都会出问题,无论做什么都会加锁(效率低)
乐观锁:
很乐观,认为什么时候都不会出问题,所以不会上锁!
获取version(数据版本号 :表示数据被修改的次数)
更新的时候比较version(在提交更新时,若刚才读取到的 version 值与当前数据库中的 version 值相等时才更新,否则重试更新操作,直到更新成功)
单线程
1 2 3 4 5 6 7 8 9 10 11 12 13 14 15
127.0.0.1:6379> set money 100
OK
127.0.0.1:6379> set out 0
OK
127.0.0.1:6379> watch money   //监视 money 对象
OK
127.0.0.1:6379> multi   //事务正常结束,数据期间没有发生变动,这个时候就正常执行成功!
OK
127.0.0.1:6379> decrby money 20
QUEUED
127.0.0.1:6379> incrby out 20
QUEUED
127.0.0.1:6379> exec
1) (integer) 80
2) (integer) 20


![FEZ4$GV[OG]WWU2QE{FUX](SpringBoot%E7%AC%94%E8%AE%B0/%5BFEZ4$GV%5BOG%5DWWU2QE%7BFUX.png)